Thick & Creamy Coconut Yoghurt (paleo. keto. low carb. vegan. gf. df)

RECIPE BY: AURORA GILBERT PHOTOGRAPHY BY: AURORA GILBERT

RECIPE BY: AURORA GILBERT
PHOTOGRAPHY BY: AURORA GILBERT

Makes 400mls

Ok so what if I told you could make thick creamy coconut yoghurt at home instead on the cheap instead of store bought coconut yoghurt that cost’s a bomb and more often than not has some questionable ingredients added to it.

It’s simple!!

A couple of things that ensure you’re going to get a thick creamy coconut yoghurt every time are;

I use the Ayam brand of coconut cream, it’s got no nasties in it and it’s just coconut cream, it doesn’t spilt, you know sometimes you buy a good organic coconut cream and open it and the coconut cream is solidified on top and there’s coconut water underneath, it hasn’t emulsified which is fine it will still work but it just means most times you won’t get a thick yoghurt… so Ayam where possible and yes you could use Ayam’s coconut milk it just won’t be as thick… so you may as well buy the coconut cream and mix it with water (same thing) if you want a thinner consistency.
I have tried heaps of other brands but find Ayam never lets me down and no I’m not sponsored.

Next I use sunflower lecithin as an emulsifier, it’s also great for our cognitive function as it’s high in choline! Note: if using an alternative brand to Ayam it assist in emulsifying the coconut cream and coconut water.
BUT please don’t get sunflower lecithin confused with soy lecithin, soy lecithin is also and emulsifier it just doesn’t have health benefits that sunflower lecithin does.

I like to make mine in my pressure cooker because it means I can manipulate the fermenting time and have yoghurt ready in 6-8 hours instead of a couple of days, I have given you both methods below.

Ingredients:

1 can coconut cream - 400mls, full fat I use Ayam
1-2 probiotic capsules, dairy free
1 tsp sunflower lecithin

OPTIONAL

1/2 tsp vanilla bean powder
salt
maple syrup
coconut sugar

Method:

  1. Put all the ingredients in the blender and blitz on high for approximately 10 seconds.

  2. Pour into clean jar and place a muslin cloth over the jar with an elastic band.

  3. Allow to ferment at room temperature for 24hr to 48hrs depending on desire taste and consistency. When the yoghurt is ready it will have a tangy taste, the longer you leave it to ferment the more tang it will have.

  4. Once your happy with the taste put the lid on the jar and store in the fridge to be consumed within the week, it will thicken up in the fridge.
    If the yoghurt has spilt into a creamy part and watery part simply stir to combine before placing in the fridge.

NB. I do this in my pressure cooker, at step 2. simply pour into the pressure cooker and press the yoghurt function, once the pressure cooker has finished follow step 4.

Also you don’t have to use a probiotic as a starter for the ferment you can simply add a couple of tablespoons of your previous coconut yoghurt in place of the probiotic as your starter.

Enjoy x

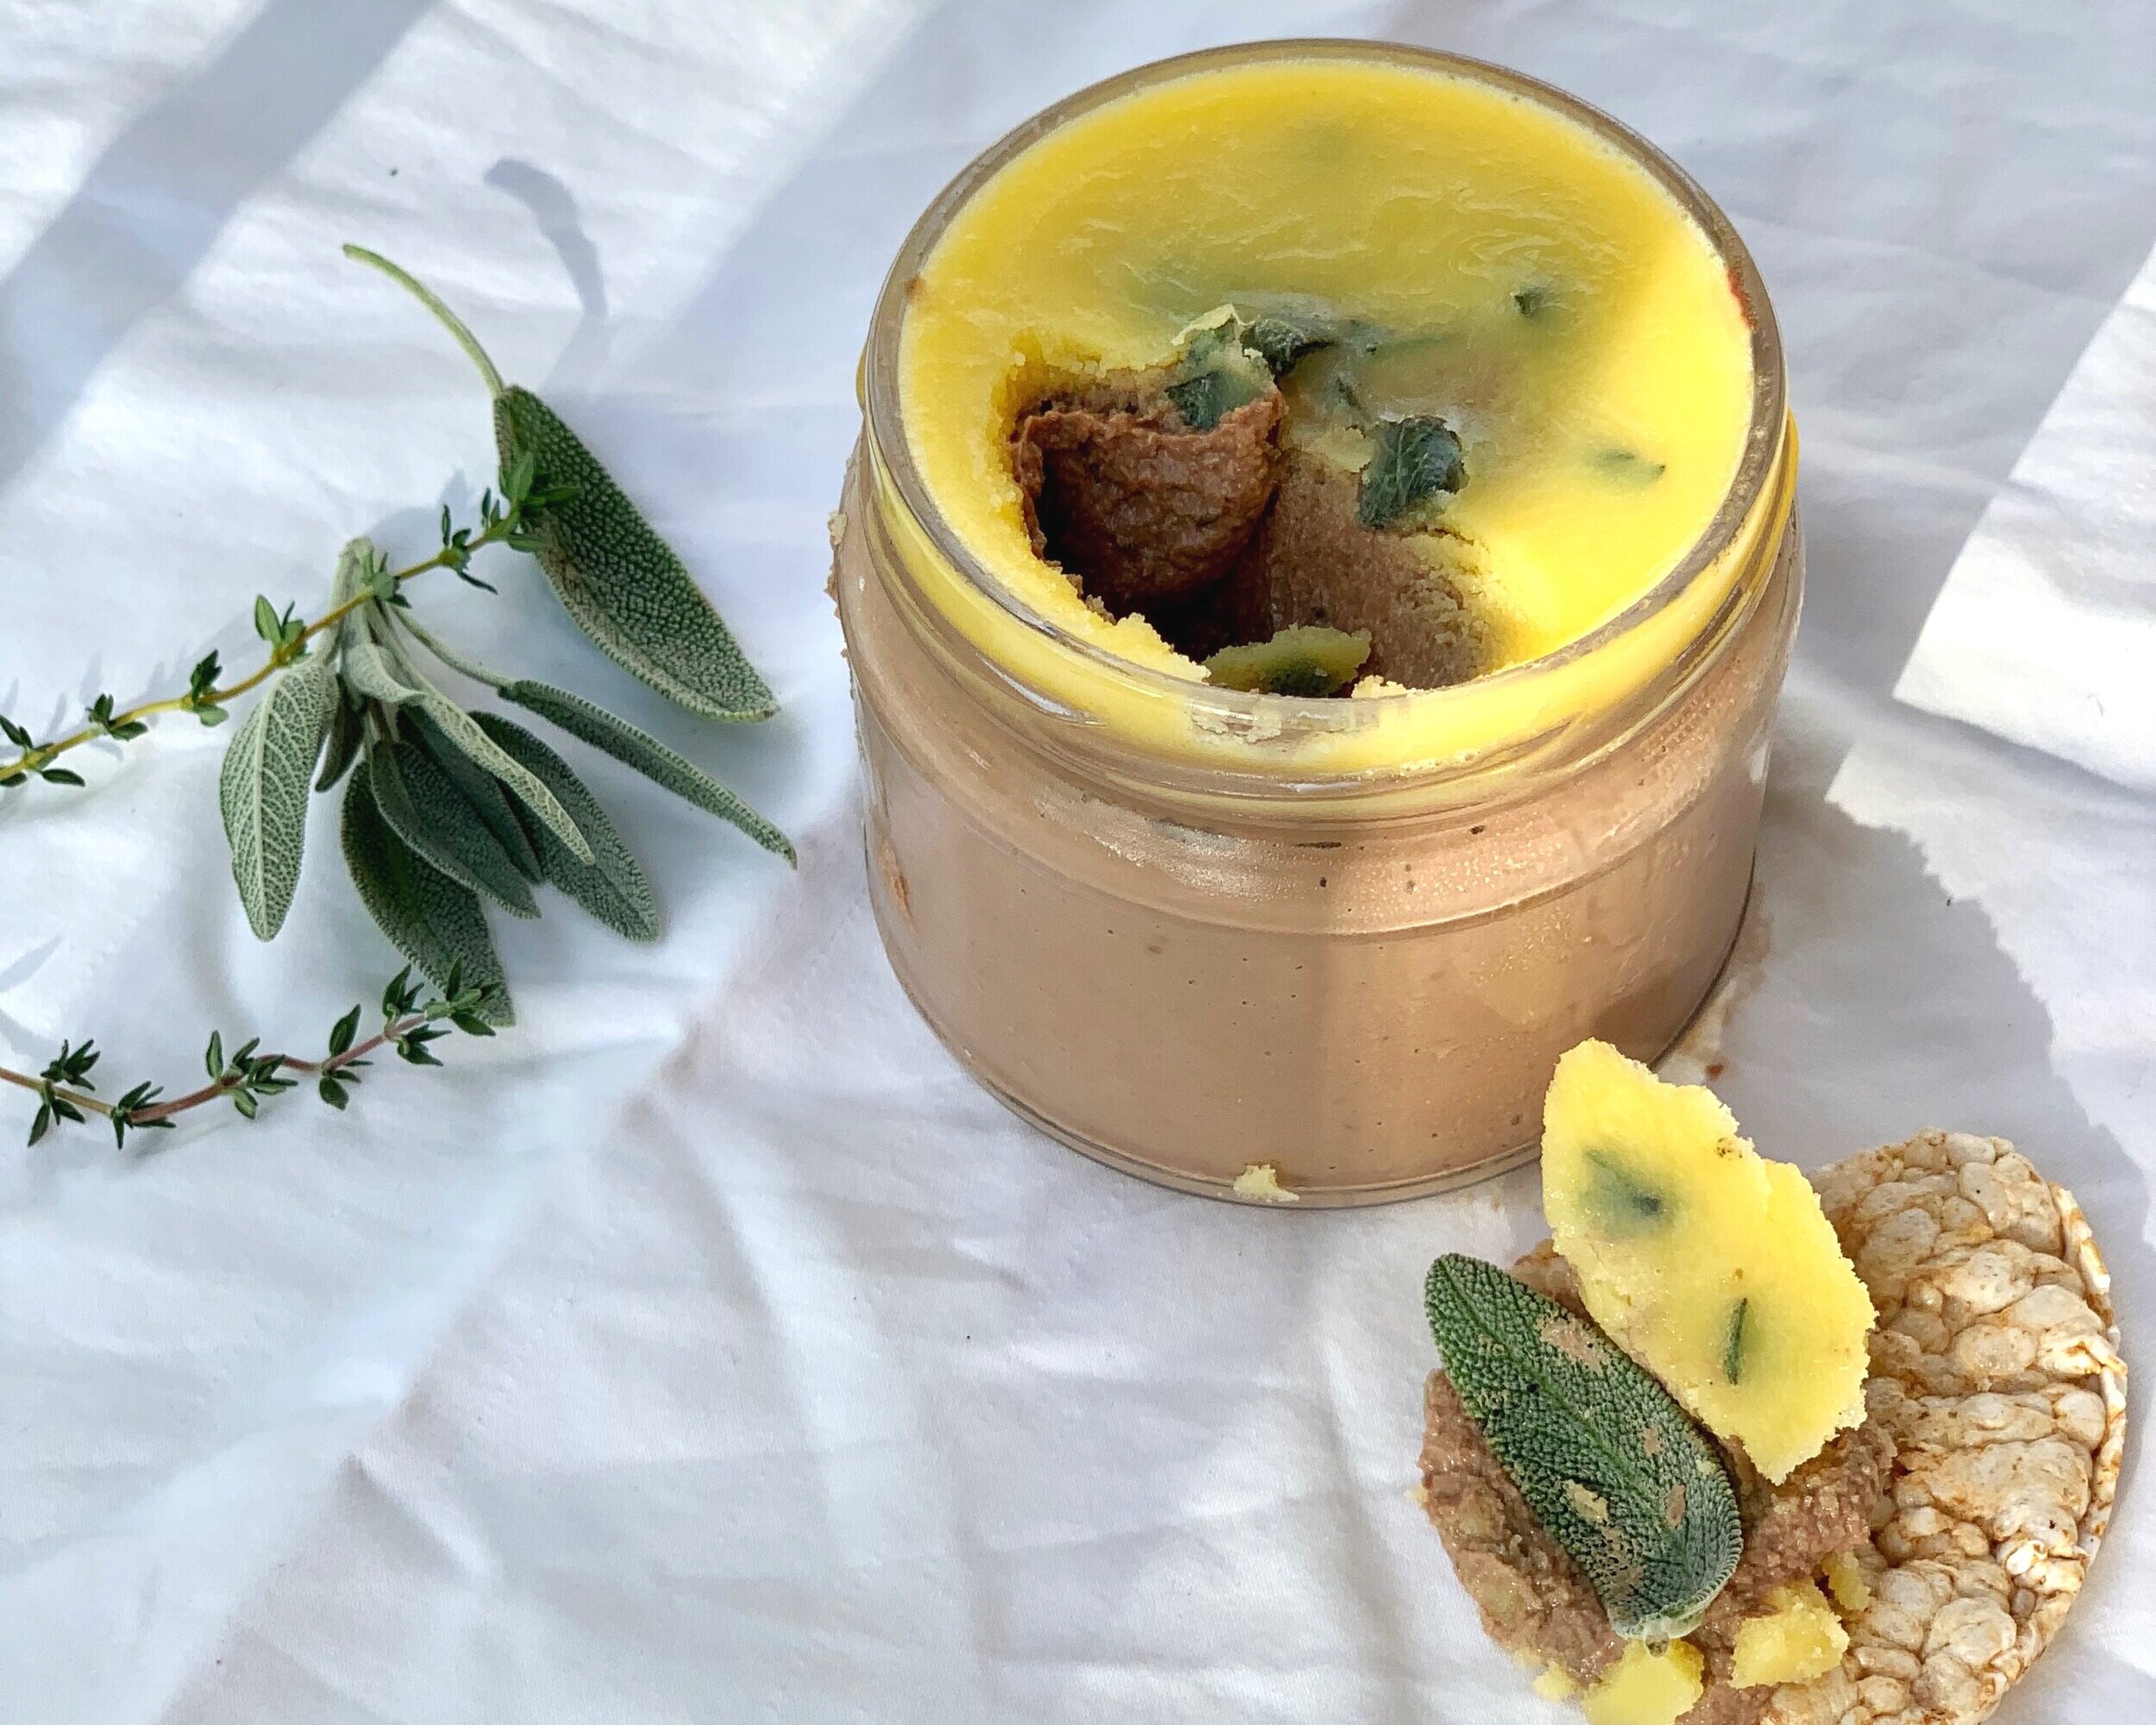
Chicken Liver Pate w/ Sage & Brandy (paleo. keto. low carb. gf)

RECIPE BY: AURORA GILBERT PHOTOGRAPHY BY: AURORA GILBERT

RECIPE BY: AURORA GILBERT
PHOTOGRAPHY BY: AURORA GILBERT

Makes 2-3 sml jars

I love pate, I eat it by the spoonful and so does everyone in our house including the dogs - they love it!!

I started making my own pate because I haven’t found a store bought pate that uses clean ingredients, one without any preservatives or ingredients that I wouldn’t even feed my dogs… and it’s actually really easy and quick to make once you get past handling the livers.

I eat pate not only because I love it but also for my iron and energy levels… for my overall health.
I am a conscious omnivore (I eat pretty much all the foods, obviously including red meat) but unfortunately my body is not great at absorbing iron even when I have it with vitamin C (helps absorption), it was especially challenging during my pregnancy with Lila and also postpartum so I have had to supplement alongside ensuring I eat iron rich nourishing foods.

Now pate is loaded with nutrients, it’s high in iron, copper, selenium, protein, folate and B vitamins - especially B12, which great for energy, it has fat soluble vitamins A, D, K and E and even has choline, which helps with cognitive function.
It helps the body fight off fatigue, restores energy levels and it’s a super tasty way to boost your micronutrients and get more nutrient dense organ meats into your life.
I also like to pimp my pate out with some medicinal mushrooms too, this completely optional I’m just addicted thats all.


Note: Contrary to beliefs that your shouldn’t eat liver because it stores toxins they actually neutralise toxins in our body and when we consume liver it assists our body’s own detoxification = win!!

Ingredients:

500g chicken livers, organic preferably
1 onion
2 cloves garlic
1 tbs porcini mushroom, dried
3 sprigs thyme, fresh
8-10 sage leaves, fresh
60mls brandy
250g butter, organic grassfed
1 tbs olive oil
1 tps salt, good quality

 OPTIONAL

1-1/2 tsp medicinal mushrooms, I use SuperFeast Mason’s Mushrooms ‘aurora10’ for a discount

Method:

  1. Pre-heat oven 140ºC and place 1/3 of the butter into a tray and allow to slowly melt until separated, this will take approximately 10 minutes. Pull out of oven and strain the milky part of the butter, keep the clarified butter and set aside.

  2. Add olive oil to saucepan on medium heat, add chopped onions, garlic porcini mushrooms and thyme leaves, cook slowly until soft, then remove the mixture into a thermomix/food processor.

  3. Turn up the heat in the saucepan and add chicken livers and most of the sages leaves. Cook the livers for a couple of minutes on one side then turn over to cook for a couple more minutes on the other side, they should still be pinkish in colour in the middle. Note: don’t over cook the livers or they will have a grainy texture.

  4. Turn the heat up to high and add brandy and cook for another minute, then add to the onion mixture in the thermomix/food processor.

  5. Add salt and remaining butter and blitz on high until well combined and creamy, approximately 1 minute then scrape down sides and blitz again for 20 seconds.

  6. Divide the mixture into jars and then pour the clarified butter over the top and add the remaining sages leaves chopped up, ensure the pate is completely covered by the clarified butter - this will seal and allow the pate to keep for longer in the fridge.

  7. Allow to cool then place in fridge to set, the pate can be eaten straight away or the pate will keep for up to two weeks provided the seal is not disturbed and the favours will continue to develop the longer it’s in the fridge.

Note: medicinal mushrooms would go in in step 5.

Enjoy x

Immune Boosting Elderberry Syrup w/ Schisandra, Hawthorn & Hibiscus (paleo. gf. df)

RECIPE BY: AURORA GILBERT PHOTOGRAPHY BY: AURORA GILBERT

RECIPE BY: AURORA GILBERT
PHOTOGRAPHY BY: AURORA GILBERT

Makes 500mls

Elderberries have been used in traditional medicine for a very long time for boosting the immune system, keeping colds and flu’s at bay and/or shortening the duration of a cold and flu, these days you can find elderberry syrup in most pharmacies, health stores or online to combat colds and flu’s.

This syrup is high in Vit C, which is great for boosting our immune system, assisting the body in wound healing, boosts collagen production, increases iron absorption and promotes tissue repair and regeneration just to name a few of benefits.

I used a blend of nutritionally potent berries, hibiscus and some ingestible essential oils to make this kick arse immune boosting syrup, the oils are high in antioxidants, especially the clove oil that is in the onguard essential oil blend and honey is antibacterial and soothing for sore throats.
This is something I usually make as the weather gets cooler to keep in the fridge and swig on daily for myself and the family.
I would generally have about a tablespoon daily and then if I do have a cold or feel one coming on I swig it say every 3 hours, I would generally give Lila about 1/2 teaspoon to a 1 teaspoon diluted in some water to sip on, which she loves the taste of too, she calls in juice.

Now if you are doing keto or no sugar simply omit the honey for your choice of sweetener or omit all together, be prepared it will taste more tart without the sweetness.

You can make this on the stove top or in a pressure cooker, I prefer the pressure cooker as it’s less mucking around.

Ingredients:

1/2 cup elderberry blend, or just elderberry
2 cups filtered water
1/2 cup raw honey
4 drops doTERRA ginger essential oil - click here to order essential oils
4 drops doTERRA onguard essential oil

OPTIONAL
1/2 tsp cinnamon, or 2 quills - add with berries to cook
1/4 tsp ground cloves, or 6 cloves - add with berries to cook
2 tbs grated ginger - add with berries to cook
Your choice of sweetener if not using honey

Method:

  1. Place elderberry and water into the pressure cooker and cook on high for 30 minutes.

  2. Once cooked strain liquid and discard berries.

  3. Once liquid has cooled and is still warm add raw honey and essential oils, mix and then pour into bottle and store in the fridge.

Stovetop: add the ingredients the same as above with 1 extra cup of filtered water to a saucepan and simmer on stove top for approximately 1 hour, the liquid will reduce to approximately 500mls. Once cooked strain and discard berries then once cool enough add honey and essential oils.

NB. If you are not using essential oils add the dried cloves, cinnamon and fresh ginger at stage 1 with the elderberries to cook.

Enjoy x

Super Gelatinous Bone Broth (paleo. keto. low carb. gf)

RECIPE BY: AURORA GILBERT PHOTOGRAPHY BY: AURORA GILBERT

RECIPE BY: AURORA GILBERT
PHOTOGRAPHY BY: AURORA GILBERT

Makes 3-4 litres

Bone broth is pretty much a staple at our house, it’s our go to for getting more nutrients in or boosting the immune system, which is key with this current nasty COVID19 situation.
It was actually my daughter Lila’s first food (easily digested) when she was 5 1/2 months old, what we used to help Benny, my baby daddy to assist with healing after a bad motorbike accident and what I consumed through pregnancy and postpartum for extra nutrients and for healing connective tissue and skin, I even give bone broth to our dogs.

Bone broth has been past down from generation to generation traditionally for digestive/ gut health and healing the body, when the bones are cooked for a long period of time the nutrients are drawn out producing a collagen rich gelatinous bone broth (use jointy bones) that’s high in nutrients like calcium, magnesium, iron, glutamine, proline and glycine just to name a few… these are building blocks that the body uses to regenerate and heal.
Collagen is the most abundant protein found in the body and unfortunately our body’s ability to make collagen starts to diminish as we age, (awesome, not) which is why we start getting wrinkles, loose lustre in our hair, our nails get brittle, looser sagging skin and everything starts to go south.
Collagen is responsible for anti-ageing, reducing inflammation, joint health and mobility, bone mineral density, healing/ replenishing our hair, skin, nails, connective tissue, gut lining, and muscles.

Drinking bone broth can help to heal and seal our gut lining, which means we are better able to absorb nutrients from our food, supports detoxification and overall it boost our immune system health, being that 70% of your immune system cells are housed in your gut this means your gut health is integral to your immunity!!

That being said, how can you use bone broth;

  • drink 1 to 3 cups daily, great for post training or breaking a fast

  • add to soup, stews, curries

  • cook rice by absorption in bone broth for nutrient dense rice, or cooked and cooled rice

  • gravy base

  • mashed veggies or potato, great in baby food

  • in a marinade

  • to braise meat in

  • steam/ sauté your vegetables in

Check out ‘favourite things’ for the curry spice mix I use by Love My Earth or my favourite go to bone broth concentrate Gevity Rx.

Ingredients:

1 kg grassfed jointy bones
filtered water, approx 3 litres
1 tbs apple cider vinegar
1 tbs salt, good quality

OPTIONAL
1 tbs medicinal mushrooms
herbs
vegetable scraps
spices, I often use curry spices
seaweed
chicken's feet, extra gelatin
 

Method:

  1. Roast bones on high for 30- 45mins.

  2. Add bones, apple cider vinegar, salt and any other herbs, vegetable scraps, seaweed etc, then top up with filtered water.

  3. Cook in pressure cooker for approx 2-3 hours or in a slow cooker for at least 8 hours.

  4. Strain liquid and store in jars.

  5. Discard the solidified fat on top or use as lard.

To make a cup of bone broth simply add 2-3 tbs of the gelatinous bone broth to some hot water and stir, I usually add salt to taste and a little butter.

Enjoy x

Macadamia & White Vanilla Choc & Chaga (paleo. keto. low carb. gf. df)

RECIPE BY: AURORA GILBERT PHOTOGRAPHY BY: AURORA GILBERT

RECIPE BY: AURORA GILBERT
PHOTOGRAPHY BY: AURORA GILBERT

Serves many 😉

This is so freakin good!!!

The toasted macadamia and coconut pair so well with the white vanilla chocolate and then with that hit of chewy sweetness and mouth feel that comes from the goji berries… I’m not a huge fan of the flavour of goji’s but in chocolate they work so well and they help boost our immune system too.

The cacao butter is loaded full of antioxidant rich fats that boost our ‘feel good’ neurotransmitters and the chaga medicinal mushroom is an amazing adaptagenic that helps our body deal with stress, works on our gut health, anti-ageing and is one of the highest known antioxidant rich food sources on the planet.

Like everything I make this is quick and simple, it’s got to be as Miss nearly two doesn’t give me much time to get shizz done… Do yourself a favour and make it!!!

Ingredients:

1/2 cup macadamia’s, toasted
1 cup coconut flakes, toasted
1/3 cup cacao butter - melted
1 tbs almond nut butter or nut butter of choice
5 tbs coconut butter
1 tsp vanilla powder
2 tbs goji berries
1-2 tsp chaga medicinal mushroom - I use SuperFeast discount code ‘aurora10’ ️  
10-15 drops monkfruit concentrate
pinch salt

OPTIONAL
collagen
mesquite powder
lucuma powder

Method:

  1. Toast the macadamia’s and coconut flakes in the oven 160º for approximately 10 minutes, check as they can toast quickly and flip over half way through, then set aside to cool.

  2. Add the melted cacao butter, coconut butter, almond nut butter, salt, vanilla, chaga and monkfruit concentrate to food processor and combine well.

  3. Add the cooled macadamia an coconut and the goji berries to the cacao butter mixture and combine.

  4. Pour mixture into baking paper line tray or into moulds and place into fridge to set.

  5. Store in fridge or freezer.

Enjoy x

Creamy Vegetables Puree w/ Bone Broth (paleo. keto. low carb. gf)

RECIPE BY: AURORA GILBERT PHOTOGRAPHY BY: AURORA GILBERT

RECIPE BY: AURORA GILBERT
PHOTOGRAPHY BY: AURORA GILBERT

Serves 2-4

This is super quick and easy to whip up and it’s versatile, I just chuck in whatever veggies are left over from the week with fresh greens and sometimes herbs from the garden… it’s really a ‘choose your own adventure’ kind of dish.

The bone broth adds extra nutrients, protein, gut loving and a depth of flavour along side the creaminess of the butter, you could use homemade bone broth which you could then simmer your veggies in the bone broth and reduce the liquid down until the veggies are cooked then blitz too.

It’s a great side dish as well as a tasty way to get extra veggies into little ones or adults too.

Ingredients:

1 broccoli
1/2 cauliflower
1 zucchini
1 bunch greens, use kale, silverbeet, spinach
2 tbs bone broth concentrate, I use Gevity Rx
2 tbs grassfed butter
Salt & pepper to taste

OPTIONAL
garlic
chilli
fresh herbs
lemon zest
splash of olive oil or truffle oil

Method:

  1. Chopped all the vegetables and steam except the bunch of greens, once cooked add cooked vegetables to a blender along with chopped greens, butter, bone broth concentrate, salt and pepper and blend until desired consistency.

  2. Or if you have a thermomix add the the chopped vegetables and butter (except greens) and cook on temperature 90 for approximately 5-10 minutes, the larger the vegetables are chopped the longer it takes to cook. Cook until vegetables are just soft then add chopped greens, bone broth concentrate, salt and pepper and blitz until desired consistency.

  3. My favourite is served with a good splash of olive oil or truffle oil, lemon zest and chilli flakes.

Enjoy x

Creamy Cashew Milk (paleo. keto. low carb. gf. df)

RECIPE BY: AURORA GILBERT PHOTOGRAPHY BY: AURORA GILBERT

RECIPE BY: AURORA GILBERT
PHOTOGRAPHY BY: AURORA GILBERT

Serves 1 litre

This is our go to milk at home!
Cashew nut milk is super creamy and versatile as a milk, it’s great if you a transitioning from cow’s milk to a plantbased milk as I find it’s the creamiest and super simple to make.
Unlike other nut or seed milks it’s not necessary to strain through a nut milk bag as the cashew particles are finer unless that’s your preference, it definitely will give it a better mouth feel if you choose to do so but I very rarely do.


You can add other nuts, seeds or sweeteners like dates if you choose to change up the flavour and nutrient profile, I like to add hemp seeds (I use this brand MyHemple use ‘aurora20’ for a discount) or macadamia nuts are delicious as well as pumpkin or sunflower seeds, the choice is yours however you may find you want to strain it through a nut milk bag if using other nuts or seeds.


It will store in the fridge fro up to 4/5 days and won’t separate when stored or curdle in your hot drink = WIN!!

Ingredients:

1 cup cashews, preferably soaked
1 tsp sunflower lecithin
1/2 tsp vanilla bean powder - optional
1000ml water, filtered 

Method:

  1. Put all the ingredients in the blender and blitz on high for approximately 60 seconds.

  2. Store in fridge and give a quick shake before using.

NB. If you blender is not high powdered add half the amount of water blitz and then add the remaining water and blitz again, you will find you get a creamier milk.
You also don’t want to over blend or your will burn the cashew nuts as the blender will heat up the liquid resulting in a bitter flavour.

Enjoy x

Salted Caramel White Choc & Chaga (paleo. keto. low carb. gf. df)

RECIPE BY: AURORA GILBERT PHOTOGRAPHY BY: AURORA GILBERT

RECIPE BY: AURORA GILBERT
PHOTOGRAPHY BY: AURORA GILBERT

Serves many :)

Have you tried Pana’s new salted caramel white chocolate… if not you really should!!! It is frickin amazeballs!!
So this recipe has been inspired by my costly Pana chocolate addiction and wanting a sugar free keto version that I can eat more guilt free, that and my Mum is type 1 diabetic and we try not eat much sugar in our house.

Cacao butter is a great option for making white chocolate as the flavour is more subtle than cacao powder, it’s also full of good fats that nourish our body and boost our bodies ‘feel good’ neurotransmitters, it can be used topically as well for nourishing and regenerating our skin…. cacao butter massage, oh that would be chocolate heaven.

I have also jacked this recipe with Chaga medicinal mushrooms as I love to do, always looking for way to get more micronutrients into the body through real food..
Chaga is a powerful anti-ageing adaptagenic medicinal mushroom that is one of the highest sources of antioxidants known on the planet as well containing skin-protecting melanin.

Chaga can support;

  • stress management

  • reduce inflammation

  • blood sugar regulation

  • liver & kidneys

  • antioxidant defences

Ok this is so easy to make!! Let’s get started!

Ingredients:

1 cup coconut milk powder
1 cup cacao butter - melted
1/4 cup mesquite powder
3 tbs vanilla collagen creamer - I use Locako discount code ‘aurora10’ ️
3 tbs caramel white chocolate collagen creamer - I use Locako discount code ‘aurora10’ ️
2 tsp chaga medicinal mushroom - I use SuperFeast discount code ‘aurora10’ ️  
6 drops monkfruit concentrate
1/4 tsp salt

Method:

  1. Place all the dry ingredients into food processor to mix, you can do this by hand in a bowl and mix well.

  2. Pour the melted cacao butter and monkfruit concentrate over dry ingredients and mix well.

  3. Pour mixture into baking paper line tray or into moulds and place into fridge to set.

  4. Store in fridge or freezer.

Enjoy x

White Chocolate Matcha (paleo. keto. low carb. gf. df)

RECIPE BY: AURORA GILBERT PHOTOGRAPHY BY: AURORA GILBERT

RECIPE BY: AURORA GILBERT
PHOTOGRAPHY BY: AURORA GILBERT

Serves 1

So why MATCHA?!
I’m caffeine sensitive so although I love to have a coffee from time to time (usual once a week or so) my body doesn’t always love me back when I do... so in place of coffee I like to have a matcha for the caffeine kick without the jitters & added nutritional value!!

I’ve then jacked this matcha latte w/ collagen for skin & connective tissue loving and added a medicinal mushroom blend for a powerful stress reliever and longevity tonic.

Some of the benefits of matcha;

  • It’s loaded with antioxidants, 1 cup of matcha is equivalent to 10 cups of green tea!!

  • Boosts metabolism  

  • Detox’s the body

  •  Calms the mind and relaxes the body through L-theanine which, is a rare amino acid that promotes relaxation 

  • Rich in fiber and chlorophyll

  • Enhances mood & aids in concentration

  • Provides vitamin C, selenium, chromium, zinc and magnesium

  • Assists in disease prevention 

  • Lowers cholesterol and blood sugar levels

I’ve also used monkfruit as the sweetener, as it doesn’t spike your blood sugar levels, you’re welcome!

And we didn’t even get into the benefits of Chaga medicinal mushrooms… #staytuned

Ingredients:

1 tsp matcha powder
1/2 tsp cacao butter - shaved
1 tbs collagen or vanilla collagen creamer - I use Locako discount code ‘aurora10’ ️
1 tsp chaga medicinal mushroom - I use SuperFeast discount code ‘aurora10’ ️  
2 drops monkfruit concentrate
250ml milk of choice 

Method:

  1. Put all the ingredients in the milk frother & let it do its thang!! 
    Or add to a saucepan and stir over gentle heat.

Enjoy x

Sauerkraut (paleo. gf. df. keto. low carb)

RECIPE BY: AURORA GILBERT PHOTOGRAPHY BY: AURORA GILBERT

RECIPE BY: AURORA GILBERT
PHOTOGRAPHY BY: AURORA GILBERT

Makes 1 large jar

Sauerkraut is a basic ferment rich in probiotics making it amazing for our gut health, it’s super simple to make and doesn’t cost you an arm and a leg like some store bought ones!!

So for me after our mental health first and foremost is our gut health (our micro-biome)!!
We are made up of bacteria, for every 10 cells in our body 9 of those are bacteria so when you are eating food your either choosing to feed and populate your ‘good bacteria’ or choosing to feed and populate your ‘bad bacteria’…

The integrity of our gut health directly correlates with our general wellbeing, with around 70% of our immune system residing in our gastointestinal tract along with approximately 95% of the production of our serotonin ‘happy chemical’ taking place there also.

Our gut health is direct to the health of our sleep, mood, skin, allergies, detoxification, digestion and absorption, boosts cancer fighting antioxidants, decreases inflammation as well as helps kill of free radical damage and more… now let’s get fermenting.

Ingredients:

1 cabbage organic
1 tbs salt - pink, sea… good quality salt
2 tsp caraway seeds

Method:

  1. Ensure your hands are clean and your jar is sterlised.

  2. Pull off outer cabbage leaves and put 2 leaves aside, cut around the cabbage to remove the core and put aside.

  3. Roughly chop cabbage then add into thermomix or food processor add the salt and caraway seeds, you may need to half at a time - half the cabbage, half the salt and half the caraway seeds. Put the thermomix on reverse (blades) and turn to speed 4.5 for approximately 10-15 seconds, use the spatula to move the cabbage around in the thermomix and scoop into bowl, if your using a food processor pulse to chop .
    You don’t want to puree the cabbage just chopped into small pieces.

  4. Start packing your jar with the cabbage mixture, while firmly pressing down the cabbage to remove any air and submerge the cabbage in liquid, do this until the jar is full. If your hand doesn’t fit in the jar use a tamper or the end of a rolling pin to press the cabbage mixture down until submerged in the salty liquid from the cabbage. NB. the salt draws the liquid out of the cabbage leaves as the cell walls of cabbage are broken down in the thermomix.

  5. Use the outer cabbage leaves to place on top of cabbage mixture and then place the core on top closing the lid of the jar, this will press the outer leaves down and keep the mixture submerged.

  6. Place out of direct sunlight on your bench top and allow to ferment for 10 - 30 days depending on the temperature - ideal temperature is 21 - 23℃ this means in summer if your house is warm the fermentation will happen faster and slower in winter or if your house is cooler. You will also need to check your sauerkraut every few days to ensure it stays submerged under the liquid, you may need to press it down again.
    Allow to ferment to your taste preference - you will know once fermentation has taken place by tasting some sauerkraut, it should be tangy/sour/pickled in taste, once your happy with the taste remove outer leaves and core and discard and store sauerkraut in the fridge for up 3 months.

Fermentation will naturally happen faster in summer if your house is warm and slower in winter if your house is cool.

NB: While it's fermenting, you may see bubbles coming through the cabbage or foam on the top; these are all signs of a healthy, happy fermentation process. The scum can be skimmed off the top either during fermentation or before refrigerating. If you see any mould, skim it off immediately and make sure your cabbage is fully submerged; don't eat mouldy parts close to the surface, but the rest of the sauerkraut is fine. Sauerkraut can be stored for several months.

Always try to choose a cabbage that is fresh and juicy and free from sprays and pesticides.

Enjoy x

White Choc Beauty Balls (paleo. gf. df. keto. low carb)

RECIPE BY: AURORA GILBERT PHOTOGRAPHY BY: AURORA GILBERT

RECIPE BY: AURORA GILBERT
PHOTOGRAPHY BY: AURORA GILBERT

Makes 12-15 balls

These white choc beauty balls are great as sweet treat or a snack on the go and they are loaded with lots of good nourishing fats to keep your hunger at bay, collagen for your hair, skin, nails and connective tissue and chaga medicinal mushrooms to assist our body in dealing with stress, gut health and longevity.


Now these beauties will NOT spike your blood sugar levels at all so ideal for those following a low carb or keto lifestyle or if your diabetic or simply trying to reduce your sugar intake.
I have used a monkfruit concentrate as the sweetener, which is derived from a small melon from Southern China that has been used for around 800 years by Buddhist Monks.
Monkfruit is natural,has zero carbs and gylaemic index, doesn’t spike your blood sugar, virtual no calories, doesn’t feed candida and a few of these sweet little drops go a long way.

Now lets get started.

Ingredients:

1.5 cups roasted cashews
1/2 cup desiccated coconut
1 tsp cacao powder
1/2 tsp vanilla powder
1/4 cup white choc collagen - I use Locakoaurora10’ for a discount
1 tsp chaga medicinal mushrooms - I use SuperFeastaurora10’ for a discount
3 tbs melted cacao butter
large pinch of salt
25 drops of monkfuit concentrate or sweetener of choice

Method:

  1. Place cashews, coconut, white choc collagen, vanilla powder, salt and chaga into the thermomix and blitz on high for about 8 seconds - blitz for longer if you want less chunks of nuts.

  2. Add the wet ingredients - cacao butter and monkfruit concentrate into thermomix and blitz until well combined. 

  3. Transfer into bowl, get your plastic gloves on (necessary or mixture sticks to your hands) and start rollin’.

  4. Place into fridge for at least two hours to cool and set or I pop mine straight into the freezer & just pull them out as I eat them..

Enjoy x

Cottage Pie (paleo. gf. low carb. keto option)

RECIPE BY: AURORA GILBERT PHOTOGRAPHY BY: AURORA GILBERT

RECIPE BY: AURORA GILBERT
PHOTOGRAPHY BY: AURORA GILBERT

Serves 6

So I love comfort food but if I make it and devour it I feel crappy the next day, my face is puffy, I feel like a truck has been doing burnouts on my head, my stomach is upset and I’m tired and then hangry from the blood sugar spike!!!

So this is my version of comfort food, a low carb cottage pie, food that’s not lacking in flavour! Tasty and healthy.
I usually do this towards the end of the week to use up a heap of veggies so this recipe changes often depending on what veggies we have on hand, so feel free to mix it up to suit you!

You’ll see I have used a monkfruit concentrate for sweetener this won’t spike your blood sugar levels but adds a bit of sweetness to the flavour, it’s optional as you’ll get some sweetest from the tomato paste, tomatoes and carrot.

And for the keto lovers you could also make this into a strict keto cottage pie by taking out the tomatoes, tomato paste and carrots. You’re welcome :)

Ingredients:

Filling:

1 onion
3 garlic cloves
500g organic beef mince
1 carrot
1 zucchini
2 cups collard greens or bunch of greens of choice
1 tbs seeded mustard
1 cup sliced mushrooms
1 tsp turmeric
1 tsp smoked paprika
2 tbs olive oil or flavourless coconut oil
1 tsp Italian spices
1/2 cup bone broth or stock
5 tbs tomato paste
5 drops of monkfruit concentrate or sweetener of choice
1/3 cup red wine - optional

Cauliflower Mash:

1 whole cauliflower
1/4 tsp turmeric
1/4 tsp smoked paprika
50g organic grassfed butter
1 cup organic cheese
1 egg
2 tomatoes, sliced
salt and pepper to taste

Method:

  1. Pre-heat oven 170ºC.

  2. Add olive oil to saucepan and sautéed onions and garlic until soft then add turmeric, smoked paprika and mushrooms and continue till mushrooms are soft then add mince till browned.

  3. Add zucchini, carrot, Italian spices, bone broth, red wine, tomato paste, seeded mustard, monkfruit concentrate, salt and pepper to your taste requirements, cook till liquid reduces then add the chopped greens stir through and turn off.

  4. Pour mixture into baking tray or large casserole dish and spread evenly.

  5. Chop cauliflower into small pieces and either steam or blitz into tiny pieces and cook in thermomix for 12mins, speed 1, temperature 100ºC.

  6. Once cauliflower is cooked add 1/2 cup of cheese, butter, turmeric, smoked paprika, egg, salt and pepper and either mash till smooth or blitz in thermomix/food processor until smooth.

  7. Pour the cauliflower mash over the mince mixture and evenly spread, place sliced tomatoes on top and cover with remaining cheese and place in the oven to cook on 170ºC for 30-40mins or until cheese is crispy.

  8. This will store in the fridge for a couple of days and is great for lunch the next day :)

Enjoy x

Ceremonial Cacao & Chaga (paleo. keto. low carb. gf. df)

RECIPE BY: AURORA GILBERT PHOTOGRAPHY BY: AURORA GILBERT

RECIPE BY: AURORA GILBERT
PHOTOGRAPHY BY: AURORA GILBERT

Serves 1

So what’s the deal with ceremonial cacao?!
Ceremonial grade cacao is found growing naturally in the wild, it’s then fermented to activate natural compounds and enhance flavour profile, lightly toasted or sun dried, cracked and then traditionally stone ground into a paste - nothing added, nothing removed.
Meaning all the good fat is still intact which is removed in cacao powder.
The fat helps balance out the stimulating properties of cacao and helps the absorption over a longer period of time.

Some of the health benefits of ceremonial grade cacao;

  • Rich in antioxidants!

  • Cacao assists the body in producing serotonin, the ‘feel good chemical’.

  • It contains PEA, which stimulates the nervous system to release the ‘love chemical’.

  • It elevates our mood, relaxes us (magnesium), speeds up metabolism, boost focus and mental acuity and leaves us feeling euphoric #yesplease

Being that’s it’s ceremonial cacao it also means your invited to sit down, take a breather, perhaps set an intention or two... journal... do gratitudes... or whatever best suits you!

And we didn’t even get into the benefits of Chaga medicinal mushrooms… #staytuned

Ingredients:

2 tsp ceremonial grade cacao - shaved
1 tsp cacao butter - shaved
2 tsp vanilla collagen creamer - I use Locako discount code ‘aurora10’ ️
1 tsp chaga medicinal mushroom - I use SuperFeast discount code ‘aurora10’ ️  
2 drops monkfruit concentrate
1 cup coconut milk 

Method:

  1. Place the ingredients into a milk frother to heat and stir or add to a saucepan and stir over gentle heat.

Enjoy x